Showing posts with label Appetisers / Light Bites. Show all posts

Friday, December 17, 2010

A Simple Salad that Goes Well with Everything, Especially Cheese...


Le Monsieur's parents are in town for holidays. They arrived on Wednesday and offered to make us dinner. Just a simple dinner, they assured us when we protested. We'll see what the supermarkets here sell.

Together, they prepared a simple salad to go with the delicious cheese that they brought from France. Camembert, done just the way it should be; a creamy reblochon from the Alps and a "disappointing" comte. Ham, bread and wine from the neighbourhood Cold Storage - from Australia and New Zealand! - completed the meal.

Garden salad
Ingredients
Dressing
2 parts vinegar (all types of vinegar will work: wine, apple, balsamic,...)
4 parts extra virgin olive oil
1 part dijon mustard
salt and pepper to taste, mix with vinegar

Salad leaves, 1 standard packet
4 medium sized tomatoes, cut into 8s
1 small onion, diced
1 garlic clove, minced (optional)
1 red chili, sliced (optional)
some chives, diced (optional)

Preparation time: 10 minutes
Cooking time: None
Level of difficuty: Easy peasy

Mix the salt and pepper together with the vinegar. Stir until the salt has completely dissolved. Add the olive oil and the mustard. Mix well and set aside.

In a big salad bowl, put the other ingredients. Add the dressing just before serving. Toss well and serve immediately.

Enjoy!

Wednesday, December 15, 2010

Lala's Pesto


I have a herb patch which I try to maintain as much as I can. So today, it was "trim the basil" day. I love basil, they add so much flavour to cooking and are the easiest herbs to grow! No fuss, just lots of water. 


After trimming the basil, I was left with a pile of basil leaves and decided to make use of them by making pesto. 


This pesto recipe was given to me by a good friend. She's a fabulous cook and I admire her courage and energy in the kitchen. She is one person that does not cook by recipe, she cooks by taste and the "feeling". 


So, here is Lala's Pesto recipe... I hope I got it right!


Ingredients
3 handfuls of basil leaves
1 handful of lightly toasted pine nuts, it is important to have them lightly toasted
75g of parmesan cheese, grated. I use parmesan from a block and grate them myself so the flavour is more intense
2 cloves of garlic, peeled
A generous splash of olive oil
Pinch of salt


Preparation time: 7mins
Cooking time: None
Level of difficulty: Easy peasy

Add the basil leaves, garlic, pine nuts in a blender and whizz until texture is rough.
Add in the parmesan cheese into the mixture and whizz until texture resembles cookie crumbs.
Finally, add in the salt and a generous splash of olive oil and whizz again until mixture is smooth.
Taste - flavour should be full bodied with a nutty finish.

The pesto can be stored in the freezer for about 6 weeks and is delicious when cooked with pasta or eaten simply with bread. 

Friday, December 10, 2010

Pasta Shells with Broccoli and Anchovies

Like Eggy, I was in the mood for some pasta this week.

I was introduced to this humble and simple pasta dish by an Italian friend. He lived near me in Paris and I used to go to his place for dinner, especially whenever he received a food parcel from his mother.

As with all Italian mothers, she was concerned that her dear son would not eat the right sort of food (usually that meant good wholesome Italian food prepared by her, of course) and took up the responsibility of sending him a food parcel every month. It was meant to last him a month.

What she didn't know was that he would invite a few friends over the following weekend and we would have an Italian food debauchery. No, her dear son didn't tell her that, it might break her heart! Her unknown fans loved her pasta sauces - the green pesto was the crowd favourite - and her homemade preserves like tomatoes and artichokes. The hams that his father cured from the boar shot the previous autumn was a treat.

Sometimes, there was a bottle of homemade alcohol. It could be sweet yellow limoncino but what we all loved was a liqueur he called noccino, made from walnuts, cinnamon and coffee. It was a dark and smoky as the limoncino was sunny and bright.

It was during one of those food feasts that my Italian friend introduced this dish to me. He used only 4 ingredients and made it within 10 minutes. I was speechless when I tasted it. It's incredible that something so simple can taste so good.

You must try it, you'll be hooked too.

Pasta Shells with Broccoli and Anchovies - Serves 2

Ingredients
150g of pasta shells
1 medium head of broccoli, cut into florets
1 can of anchovies in olive oil (50g)
Olive oil

A large pinch of salt (for boiling pasta)
Pepper to taste

Preparation time: 3 mins
Cooking time: 10 mins
Level of difficulty: Easy peasy

In a boiling pot of water, add the pasta and salt. Stir occasionally. You can add some olive oil to prevent the pasta from sticking. After 3 minutes, add the broccoli florets. Continue cooking for another 10 minutes or until pasta is just short of al dente.

Meanwhile, using a similarly sized pot, add the anchovies. Put the pot on low heat. You will see the anchovies slowly melting in the oil.

Drain the pasta and broccoli well, add to the pot with the melted anchovies. Mix well and remove from heat. Add a little olive oil if the pasta looks too dry. Leave the pasta to sit for about 10 minutes to soak in the anchovy flavours before serving.

You can also keep it in the fridge overnight and serve cold.

Friday, December 3, 2010

Cold Tofu


This is one of my mama's speciality. It's healthy and simply to prepare, and best of all, it's perfect for the hot weather - very important criteria for a busy mother with 3 hyperactive kids. We usually had it for lunch, when the noon day heat made us cranky and restless.

The crunchy shallot bits were my favourite parts. It was a race against my brothers to be the first to scrap them off the top and spoon them into my mouth, before they soften in the sauce.

Now, it's the silky texture of the tofu that that I appreciate, and the cool taste in my mouth. It almost slows down time and calms me down after a stressful day at work.

Let's just sit back and enjoy this beautiful dish of cold fresh tofu.

Ingredients
1 block of fresh silky tofu

Garnish
Coriandar, chopped
Spring onions, finely cut
1 tablespoon of fried shallots
1 red chili, finely sliced (optional)

Sauce
1 tablespoon of dark soya sauce
Half tablespoon of sesame oil

Preparation time: 5 mins
Cooking time: None required
Level of difficulty: Easy peasy

Open the pack of tofu and drain off the liquid. Carefully transfer the tofu to a small serving plate. Mix the ingredients for the sauce and dribble over the tofu. Garnish with the herbs and fried shallot. Serve very cold.

Tuesday, November 30, 2010

Caprese Salad

I recently changed careers and am now working from home. So lunch can sometimes be a little hassle. In Singapore, it is so easy to walk out and buy something from the hawker center or food court, but I do not like having a heavy lunch. It makes me very unproductive in the afternoon and since I work from home, it is hard to restrain myself from naps. So, I have been trying to be healthy and making a light meal for myself. 


Like today, a refreshing caprese salad made a satisfying lunch and then its back to work!


Ingredients
1 large size tomato - I am a big fan of the Japanese tomatoes
1 mozzarella di buffalo - this ingredient is KEY, use a good one please!
Basil leaves, freshly picked or from the fresh herb section in the supermarket
Olive oil
Balsamic vinegar
Salt and Pepper


Preparation time: 7mins
Cooking time: none
Level of difficulty: Easy peasy

Wash and slice the tomato keeping a 0.5cm thickness and l
ine them up on a plate.

Slice the mozzarella di buffalo (it comes in a ball, drain the liquid and slice) and place on top of the tomatoes.
For the basil leaves, press each leaf to release its flavours before tearing them into small pieces and scatter them on top of the mozzarella.
Drizzle some olive oil on top and sprinkle some salt and pepper to taste.

I have my balsamic vinegar on the side as not everyone likes it. However, you can lightly drizzle it with the olive oil if you are a fan. Enjoy! 


Friday, November 26, 2010

Thai Calamari Salad

I have a love-hate relationship with calamari. I love the taste and tender texture of well-prepared calamari. For some strange reasons, it always evokes thoughts of the Amalfi Coast in Italy... Strange because I'm sure that I didn't have any squid when I was there. Perhaps I associate good calamari with warm fuzzy thoughts of Italy. Ahhh, Italy.... *sigh*

But I hate calamari when its texture becomes rubbery. Like microwaved calamari rings or squid that we find with fried noodles in Singapore. I can't figure out whether it is due to overcooking (my theory) or undercooking (le Monsieur's theory). Never mind, one look at the succulent white rubber band would send me shuddering for the rest of the meal. *shivers*

This Thai calamari salad has never failed me. Scoring the insides of the calamari makes the tough interior less tough and chewy. You know it's perfectly cooked when it curls up. Not too overcooked or undercooked, just well-cooked and tender - the way calamari is meant to be enjoyed.

Thai Calamari Salad - serves 2
Ingredients
2 cleaned calamari
2 japanese cucumber, sliced thinly
2 red shallots, diced finely
1 handful of coriander, cut finely
Cooking oil

Dressing sauce
1 red chili, deseeded and diced finely
1 tablespoon fish sauce
Juice of 1 green lime
1 teaspoon of sugar (optional)

Preparation time: 20 mins
Cooking time: 10 mins

Put the cucumber, shallots and coriander in a big bowl. Leave to chill in the fridge. In a small mixing bowl, mix the ingredients for the dressing sauce. If using sugar, stir until all the sugar has been dissolved. Set aside.

Open up the calamari, cut into 2 pieces. Score the inside of the calamari in a crisscross pattern. and slice into 3 cm strips.

Heat up some cooking oil in a frying pan on high heat. When hot, place the calamari, score-side down, on the pan and cook until golden and crispy on the edges. Flip over and cook until curled. Remove from heat and add into the bowl with cucumber, shallots and coriandar. Toss quickly with dressing sauce.

Serve immediately. To make it into a meal, you may serve with a bowl of steaming white rice.


Friday, November 19, 2010

Dumplings, Korean Style


Dumplings!

A friend once called dumplings a mouthful of meat and that's exactly what these Korean inspired dumplings are not!

I've mixed some silky tofu and kimchi in the minced meat to refine the texture and charge up the taste factor. And they are really a mean mouthful of goodness now. Try it, and you'l know what I mean.

Dumplings, Korean Style - makes 20-25
Ingredients
300g minced pork
200g silky tofu
200g kimchi, sliced into small pieces (squeeze out as much liquid as you can)
1 egg
Dumpling wrappers (the white ones are preferable to the yellow "wantan" ones for this)
Chinese 5 spice power
Soya sauce
Sesame oil

Dipping sauce
1 tablespoon of soya sauce
1 tablespoon of mirin
A few stalks of chives, cut finely

Preparation time: 25 mins
Cooking time: 10 mins
Level of difficulty: Easy peasy

Marinate the minced pork with soya sauce, sesame oil and a big dash of Chinese 5 spice sauce. Leave in the fridge for at least 2 hours.

Mix the pork, tofu and kimchi in a big mixing bowl. In a separate bowl, beat an egg and add this to the minced pork mixture.

With dry clean hands, peel off 1 dumpling wrapper and put a tablespoon of the minced mixture in the middle, leaving some space around the edges. Quickly moisten the edges with a little water and fold into a semi-circle. Check that there are no air bubbles trapped inside or it will break the wrapper when cooking.

Arrange in a steamer and steam for around 10 minutes. In the meantime, prepare the dipping sauce by mixing the ingredients together. Serve immediately.

Friday, November 5, 2010

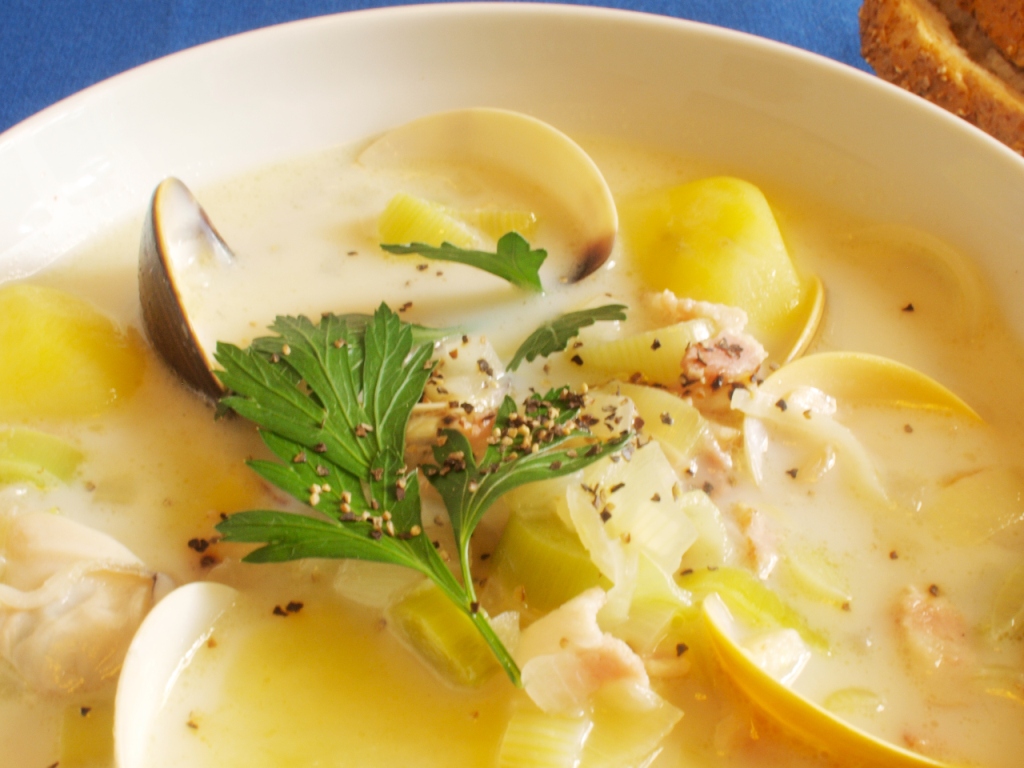
Tasmanian Clam Soup


The week's holiday in Australia left me with a vague suspicion that my clothes had shrunk in the wash. My jeans waistband was too tight.

Or was it because I had eaten too much...? ...? ...?

Well, during the week, I had some really really REALLY good clam soup for lunch in a tiny little Tasmanian restaurant, and wanted to reproduce my own little interpretation of it.

Coincidentally I had some stock base made from pork ribs in the freezer, left over from the soba noodles in pork ribs miso soup that I had made previously, and it was a great chance to put it to good use.

Tasmanian Clam Soup - serves 4

Ingredients

1kg fresh clams, soaked and rinsed
1kg waxy potatoes, peeled and cut into small pieces
300g bacon, diced
1 onion, diced
1 leek, sliced finely
2 cloves of garlic, diced finely
1 tablespoon of plain flour
300ml skim milk (you might want to substitute with cream for a richer taste)
1 litre soup stock
Italian parsley for garnish

Preparation time: 30 mins
Cooking time: 30 mins
Level of difficulty: Easy peasy

Heat the soup stock until boiling, add the clams and continue cooking at high heat until all the clams have opened. Separate the cooked clams from the stock, discarding any that remained closed. Set aside.

Continue heating the stock until it is reduced to half its volume.

In a separate bowl, scoop out a few tablespoons of the hot stock and stir in the flour until a thick paste is obtained. Avoid lumps by adding the flour very slowly to the stock. Set aside.

Add the potatoes into another pot of boiling water. Cook for 10-15 mins or until the potatoes yield easily to a fork. Drain, rinse in cold water to stop the cooking. Set aside.

In a deep saucepan, saute the bacon on medium heat until slightly crispy. Add the onions, leek and garlic. Fry until soft and translucent. Add a little of the stock into the saucepan. Stir in the flour paste, stirring to mix thoroughly. Reduce heat and add the rest of the stock.

Remove from heat. Stir in the milk to the soup. Add the potatoes and clams.

Serve in 4 soup bowls, with toasted crusty bread. Garnish with Italian parsley.