Showing posts with label Appetisers / Light Bites. Show all posts
Friday, December 17, 2010
A Simple Salad that Goes Well with Everything, Especially Cheese...
Le Monsieur's parents are in town for holidays. They arrived on Wednesday and offered to make us dinner. Just a simple dinner, they assured us when we protested. We'll see what the supermarkets here sell.
Together, they prepared a simple salad to go with the delicious cheese that they brought from France. Camembert, done just the way it should be; a creamy reblochon from the Alps and a "disappointing" comte. Ham, bread and wine from the neighbourhood Cold Storage - from Australia and New Zealand! - completed the meal.
Garden salad
Ingredients
Dressing
2 parts vinegar (all types of vinegar will work: wine, apple, balsamic,...)
4 parts extra virgin olive oil
1 part dijon mustard
salt and pepper to taste, mix with vinegar
Salad leaves, 1 standard packet
4 medium sized tomatoes, cut into 8s
1 small onion, diced
1 garlic clove, minced (optional)
1 red chili, sliced (optional)
some chives, diced (optional)
Preparation time: 10 minutes
Cooking time: None
Level of difficuty: Easy peasy
Mix the salt and pepper together with the vinegar. Stir until the salt has completely dissolved. Add the olive oil and the mustard. Mix well and set aside.
In a big salad bowl, put the other ingredients. Add the dressing just before serving. Toss well and serve immediately.
Enjoy!
Wednesday, December 15, 2010
Lala's Pesto
I have a herb patch which I try to maintain as much as I can. So today, it was "trim the basil" day. I love basil, they add so much flavour to cooking and are the easiest herbs to grow! No fuss, just lots of water.
After trimming the basil, I was left with a pile of basil leaves and decided to make use of them by making pesto.
This pesto recipe was given to me by a good friend. She's a fabulous cook and I admire her courage and energy in the kitchen. She is one person that does not cook by recipe, she cooks by taste and the "feeling".
So, here is Lala's Pesto recipe... I hope I got it right!
Ingredients
3 handfuls of basil leaves
1 handful of lightly toasted pine nuts, it is important to have them lightly toasted
75g of parmesan cheese, grated. I use parmesan from a block and grate them myself so the flavour is more intense
2 cloves of garlic, peeled
A generous splash of olive oil
Pinch of salt
Preparation time: 7mins
Cooking time: None
Level of difficulty: Easy peasy
Add the basil leaves, garlic, pine nuts in a blender and whizz until texture is rough.
Add in the parmesan cheese into the mixture and whizz until texture resembles cookie crumbs.
Finally, add in the salt and a generous splash of olive oil and whizz again until mixture is smooth.
Taste - flavour should be full bodied with a nutty finish.
The pesto can be stored in the freezer for about 6 weeks and is delicious when cooked with pasta or eaten simply with bread.
Friday, December 10, 2010
Pasta Shells with Broccoli and Anchovies
Like Eggy, I was in the mood for some pasta this week.
I was introduced to this humble and simple pasta dish by an Italian friend. He lived near me in Paris and I used to go to his place for dinner, especially whenever he received a food parcel from his mother.
As with all Italian mothers, she was concerned that her dear son would not eat the right sort of food (usually that meant good wholesome Italian food prepared by her, of course) and took up the responsibility of sending him a food parcel every month. It was meant to last him a month.
What she didn't know was that he would invite a few friends over the following weekend and we would have an Italian food debauchery. No, her dear son didn't tell her that, it might break her heart! Her unknown fans loved her pasta sauces - the green pesto was the crowd favourite - and her homemade preserves like tomatoes and artichokes. The hams that his father cured from the boar shot the previous autumn was a treat.
Sometimes, there was a bottle of homemade alcohol. It could be sweet yellow limoncino but what we all loved was a liqueur he called noccino, made from walnuts, cinnamon and coffee. It was a dark and smoky as the limoncino was sunny and bright.
It was during one of those food feasts that my Italian friend introduced this dish to me. He used only 4 ingredients and made it within 10 minutes. I was speechless when I tasted it. It's incredible that something so simple can taste so good.
You must try it, you'll be hooked too.
Pasta Shells with Broccoli and Anchovies - Serves 2
Ingredients
150g of pasta shells
1 medium head of broccoli, cut into florets
1 can of anchovies in olive oil (50g)
Olive oil
A large pinch of salt (for boiling pasta)
Pepper to taste
Preparation time: 3 mins
Cooking time: 10 mins
Level of difficulty: Easy peasy
In a boiling pot of water, add the pasta and salt. Stir occasionally. You can add some olive oil to prevent the pasta from sticking. After 3 minutes, add the broccoli florets. Continue cooking for another 10 minutes or until pasta is just short of al dente.
Meanwhile, using a similarly sized pot, add the anchovies. Put the pot on low heat. You will see the anchovies slowly melting in the oil.
Drain the pasta and broccoli well, add to the pot with the melted anchovies. Mix well and remove from heat. Add a little olive oil if the pasta looks too dry. Leave the pasta to sit for about 10 minutes to soak in the anchovy flavours before serving.
You can also keep it in the fridge overnight and serve cold.
I was introduced to this humble and simple pasta dish by an Italian friend. He lived near me in Paris and I used to go to his place for dinner, especially whenever he received a food parcel from his mother.
As with all Italian mothers, she was concerned that her dear son would not eat the right sort of food (usually that meant good wholesome Italian food prepared by her, of course) and took up the responsibility of sending him a food parcel every month. It was meant to last him a month.
What she didn't know was that he would invite a few friends over the following weekend and we would have an Italian food debauchery. No, her dear son didn't tell her that, it might break her heart! Her unknown fans loved her pasta sauces - the green pesto was the crowd favourite - and her homemade preserves like tomatoes and artichokes. The hams that his father cured from the boar shot the previous autumn was a treat.
Sometimes, there was a bottle of homemade alcohol. It could be sweet yellow limoncino but what we all loved was a liqueur he called noccino, made from walnuts, cinnamon and coffee. It was a dark and smoky as the limoncino was sunny and bright.
It was during one of those food feasts that my Italian friend introduced this dish to me. He used only 4 ingredients and made it within 10 minutes. I was speechless when I tasted it. It's incredible that something so simple can taste so good.
You must try it, you'll be hooked too.
Pasta Shells with Broccoli and Anchovies - Serves 2
Ingredients
150g of pasta shells
1 medium head of broccoli, cut into florets
1 can of anchovies in olive oil (50g)
Olive oil
A large pinch of salt (for boiling pasta)
Pepper to taste
Preparation time: 3 mins
Cooking time: 10 mins
Level of difficulty: Easy peasy
In a boiling pot of water, add the pasta and salt. Stir occasionally. You can add some olive oil to prevent the pasta from sticking. After 3 minutes, add the broccoli florets. Continue cooking for another 10 minutes or until pasta is just short of al dente.
Meanwhile, using a similarly sized pot, add the anchovies. Put the pot on low heat. You will see the anchovies slowly melting in the oil.
Drain the pasta and broccoli well, add to the pot with the melted anchovies. Mix well and remove from heat. Add a little olive oil if the pasta looks too dry. Leave the pasta to sit for about 10 minutes to soak in the anchovy flavours before serving.
You can also keep it in the fridge overnight and serve cold.
Friday, December 3, 2010
Cold Tofu
This is one of my mama's speciality. It's healthy and simply to prepare, and best of all, it's perfect for the hot weather - very important criteria for a busy mother with 3 hyperactive kids. We usually had it for lunch, when the noon day heat made us cranky and restless.
The crunchy shallot bits were my favourite parts. It was a race against my brothers to be the first to scrap them off the top and spoon them into my mouth, before they soften in the sauce.
Now, it's the silky texture of the tofu that that I appreciate, and the cool taste in my mouth. It almost slows down time and calms me down after a stressful day at work.
Let's just sit back and enjoy this beautiful dish of cold fresh tofu.
Ingredients
1 block of fresh silky tofu
Garnish
Coriandar, chopped
Spring onions, finely cut
1 tablespoon of fried shallots
1 red chili, finely sliced (optional)
Sauce
1 tablespoon of dark soya sauce
Half tablespoon of sesame oil
Preparation time: 5 mins
Cooking time: None required
Level of difficulty: Easy peasy
Open the pack of tofu and drain off the liquid. Carefully transfer the tofu to a small serving plate. Mix the ingredients for the sauce and dribble over the tofu. Garnish with the herbs and fried shallot. Serve very cold.
Tuesday, November 30, 2010
Caprese Salad
I recently changed careers and am now working from home. So lunch can sometimes be a little hassle. In Singapore, it is so easy to walk out and buy something from the hawker center or food court, but I do not like having a heavy lunch. It makes me very unproductive in the afternoon and since I work from home, it is hard to restrain myself from naps. So, I have been trying to be healthy and making a light meal for myself.
Like today, a refreshing caprese salad made a satisfying lunch and then its back to work!
Ingredients
1 large size tomato - I am a big fan of the Japanese tomatoes
1 mozzarella di buffalo - this ingredient is KEY, use a good one please!
Basil leaves, freshly picked or from the fresh herb section in the supermarket
Olive oil
Balsamic vinegar
Salt and Pepper
Preparation time: 7mins
Cooking time: none
Level of difficulty: Easy peasy
Like today, a refreshing caprese salad made a satisfying lunch and then its back to work!
Ingredients
1 large size tomato - I am a big fan of the Japanese tomatoes
1 mozzarella di buffalo - this ingredient is KEY, use a good one please!
Basil leaves, freshly picked or from the fresh herb section in the supermarket
Olive oil
Balsamic vinegar
Salt and Pepper
Preparation time: 7mins
Cooking time: none
Level of difficulty: Easy peasy
Wash and slice the tomato keeping a 0.5cm thickness and l
ine them up on a plate.
Slice the mozzarella di buffalo (it comes in a ball, drain the liquid and slice) and place on top of the tomatoes.
For the basil leaves, press each leaf to release its flavours before tearing them into small pieces and scatter them on top of the mozzarella.
Drizzle some olive oil on top and sprinkle some salt and pepper to taste.
I have my balsamic vinegar on the side as not everyone likes it. However, you can lightly drizzle it with the olive oil if you are a fan. Enjoy!
Friday, November 26, 2010
Thai Calamari Salad
I have a love-hate relationship with calamari. I love the taste and tender texture of well-prepared calamari. For some strange reasons, it always evokes thoughts of the Amalfi Coast in Italy... Strange because I'm sure that I didn't have any squid when I was there. Perhaps I associate good calamari with warm fuzzy thoughts of Italy. Ahhh, Italy.... *sigh*
But I hate calamari when its texture becomes rubbery. Like microwaved calamari rings or squid that we find with fried noodles in Singapore. I can't figure out whether it is due to overcooking (my theory) or undercooking (le Monsieur's theory). Never mind, one look at the succulent white rubber band would send me shuddering for the rest of the meal. *shivers*
This Thai calamari salad has never failed me. Scoring the insides of the calamari makes the tough interior less tough and chewy. You know it's perfectly cooked when it curls up. Not too overcooked or undercooked, just well-cooked and tender - the way calamari is meant to be enjoyed.
But I hate calamari when its texture becomes rubbery. Like microwaved calamari rings or squid that we find with fried noodles in Singapore. I can't figure out whether it is due to overcooking (my theory) or undercooking (le Monsieur's theory). Never mind, one look at the succulent white rubber band would send me shuddering for the rest of the meal. *shivers*
This Thai calamari salad has never failed me. Scoring the insides of the calamari makes the tough interior less tough and chewy. You know it's perfectly cooked when it curls up. Not too overcooked or undercooked, just well-cooked and tender - the way calamari is meant to be enjoyed.
Thai Calamari Salad - serves 2
Ingredients
2 cleaned calamari
2 japanese cucumber, sliced thinly
2 red shallots, diced finely
1 handful of coriander, cut finely
Cooking oil
Dressing sauce
1 red chili, deseeded and diced finely
1 tablespoon fish sauce
Juice of 1 green lime
1 teaspoon of sugar (optional)
Preparation time: 20 mins
Cooking time: 10 mins
Put the cucumber, shallots and coriander in a big bowl. Leave to chill in the fridge. In a small mixing bowl, mix the ingredients for the dressing sauce. If using sugar, stir until all the sugar has been dissolved. Set aside.
Open up the calamari, cut into 2 pieces. Score the inside of the calamari in a crisscross pattern. and slice into 3 cm strips.
Heat up some cooking oil in a frying pan on high heat. When hot, place the calamari, score-side down, on the pan and cook until golden and crispy on the edges. Flip over and cook until curled. Remove from heat and add into the bowl with cucumber, shallots and coriandar. Toss quickly with dressing sauce.
Serve immediately. To make it into a meal, you may serve with a bowl of steaming white rice.
Ingredients
2 cleaned calamari
2 japanese cucumber, sliced thinly
2 red shallots, diced finely
1 handful of coriander, cut finely
Cooking oil
Dressing sauce
1 red chili, deseeded and diced finely
1 tablespoon fish sauce
Juice of 1 green lime
1 teaspoon of sugar (optional)
Preparation time: 20 mins
Cooking time: 10 mins
Put the cucumber, shallots and coriander in a big bowl. Leave to chill in the fridge. In a small mixing bowl, mix the ingredients for the dressing sauce. If using sugar, stir until all the sugar has been dissolved. Set aside.
Open up the calamari, cut into 2 pieces. Score the inside of the calamari in a crisscross pattern. and slice into 3 cm strips.
Heat up some cooking oil in a frying pan on high heat. When hot, place the calamari, score-side down, on the pan and cook until golden and crispy on the edges. Flip over and cook until curled. Remove from heat and add into the bowl with cucumber, shallots and coriandar. Toss quickly with dressing sauce.
Serve immediately. To make it into a meal, you may serve with a bowl of steaming white rice.
Friday, November 19, 2010
Dumplings, Korean Style
Dumplings!
A friend once called dumplings a mouthful of meat and that's exactly what these Korean inspired dumplings are not!
I've mixed some silky tofu and kimchi in the minced meat to refine the texture and charge up the taste factor. And they are really a mean mouthful of goodness now. Try it, and you'l know what I mean.
Dumplings, Korean Style - makes 20-25
Ingredients
300g minced pork
200g silky tofu
200g kimchi, sliced into small pieces (squeeze out as much liquid as you can)
1 egg
Dumpling wrappers (the white ones are preferable to the yellow "wantan" ones for this)
Chinese 5 spice power
Soya sauce
Sesame oil
Dipping sauce
1 tablespoon of soya sauce
1 tablespoon of mirin
A few stalks of chives, cut finely
Preparation time: 25 mins
Cooking time: 10 mins
Level of difficulty: Easy peasy
Marinate the minced pork with soya sauce, sesame oil and a big dash of Chinese 5 spice sauce. Leave in the fridge for at least 2 hours.
Mix the pork, tofu and kimchi in a big mixing bowl. In a separate bowl, beat an egg and add this to the minced pork mixture.
With dry clean hands, peel off 1 dumpling wrapper and put a tablespoon of the minced mixture in the middle, leaving some space around the edges. Quickly moisten the edges with a little water and fold into a semi-circle. Check that there are no air bubbles trapped inside or it will break the wrapper when cooking.
Arrange in a steamer and steam for around 10 minutes. In the meantime, prepare the dipping sauce by mixing the ingredients together. Serve immediately.
Ingredients
300g minced pork
200g silky tofu
200g kimchi, sliced into small pieces (squeeze out as much liquid as you can)
1 egg
Dumpling wrappers (the white ones are preferable to the yellow "wantan" ones for this)
Chinese 5 spice power
Soya sauce
Sesame oil
Dipping sauce
1 tablespoon of soya sauce
1 tablespoon of mirin
A few stalks of chives, cut finely
Preparation time: 25 mins
Cooking time: 10 mins
Level of difficulty: Easy peasy
Marinate the minced pork with soya sauce, sesame oil and a big dash of Chinese 5 spice sauce. Leave in the fridge for at least 2 hours.
Mix the pork, tofu and kimchi in a big mixing bowl. In a separate bowl, beat an egg and add this to the minced pork mixture.
With dry clean hands, peel off 1 dumpling wrapper and put a tablespoon of the minced mixture in the middle, leaving some space around the edges. Quickly moisten the edges with a little water and fold into a semi-circle. Check that there are no air bubbles trapped inside or it will break the wrapper when cooking.
Arrange in a steamer and steam for around 10 minutes. In the meantime, prepare the dipping sauce by mixing the ingredients together. Serve immediately.
Friday, November 5, 2010
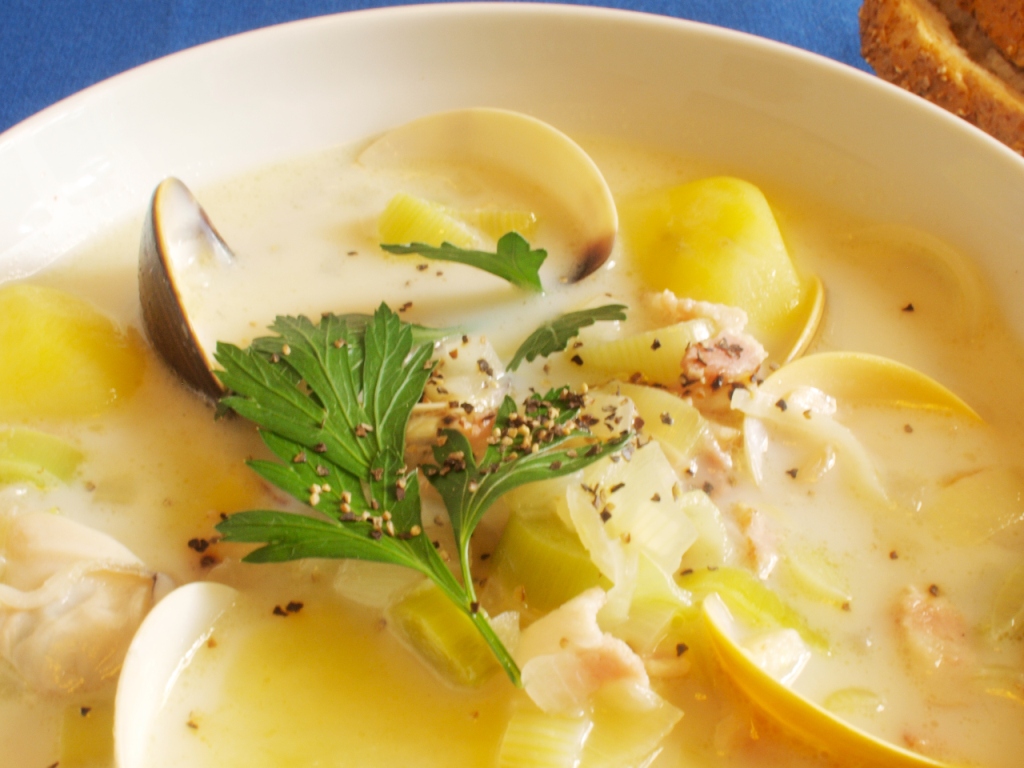
Tasmanian Clam Soup
The week's holiday in Australia left me with a vague suspicion that my clothes had shrunk in the wash. My jeans waistband was too tight.
Or was it because I had eaten too much...? ...? ...?
Well, during the week, I had some really really REALLY good clam soup for lunch in a tiny little Tasmanian restaurant, and wanted to reproduce my own little interpretation of it.
Coincidentally I had some stock base made from pork ribs in the freezer, left over from the soba noodles in pork ribs miso soup that I had made previously, and it was a great chance to put it to good use.
Tasmanian Clam Soup - serves 4
Ingredients
1kg fresh clams, soaked and rinsed
1kg waxy potatoes, peeled and cut into small pieces
300g bacon, diced
1 onion, diced
1 leek, sliced finely
2 cloves of garlic, diced finely
1 tablespoon of plain flour
300ml skim milk (you might want to substitute with cream for a richer taste)
1 litre soup stock
Italian parsley for garnish
Preparation time: 30 mins
Cooking time: 30 mins
Level of difficulty: Easy peasy
Heat the soup stock until boiling, add the clams and continue cooking at high heat until all the clams have opened. Separate the cooked clams from the stock, discarding any that remained closed. Set aside.
Continue heating the stock until it is reduced to half its volume.
In a separate bowl, scoop out a few tablespoons of the hot stock and stir in the flour until a thick paste is obtained. Avoid lumps by adding the flour very slowly to the stock. Set aside.
Add the potatoes into another pot of boiling water. Cook for 10-15 mins or until the potatoes yield easily to a fork. Drain, rinse in cold water to stop the cooking. Set aside.
In a deep saucepan, saute the bacon on medium heat until slightly crispy. Add the onions, leek and garlic. Fry until soft and translucent. Add a little of the stock into the saucepan. Stir in the flour paste, stirring to mix thoroughly. Reduce heat and add the rest of the stock.
Remove from heat. Stir in the milk to the soup. Add the potatoes and clams.
Serve in 4 soup bowls, with toasted crusty bread. Garnish with Italian parsley.
Tuesday, October 26, 2010
Aaaaaantipastiiiiiiiiii Series 3
I know I said that I would just do 2 series of antipasti... but I could not help myself. I had to share this recipe for grilled vegetables. It compliments as side dish to meats, especially beef and is very healthy. Here is something which I picked up in my latest travels to Italy, key ingredients - Olive oil, herbs, salt and pepper... So easy!
Ingredients
Selection of vegetables - I use yellow and red peppers, courgettes and portobello mushrooms
Herbs - Garlic and lots of thyme
1/4 of lemon
Olive oil
Salt and pepper
Preparation time: 15mins
Cooking time: 10mins
Level of difficulty: Easy peasy
Start by making the flavoured oil - Crush 4-5 cloves of garlic and thyme together, mix together with about 75ml of olive oil. Add salt and pepper to season.
While the oil is being infused with all the flavours, prepare the vegetable.
Cut and remove the seeds from the peppers, thinly slice the courgettes and prepare the mushrooms as in Kitchen Tip#5.
Use a brush and generously brush the flavoured oil onto the vegetables.
Heat the grill on high until it is hot.
Place the vegetable on the grill and turn only when you see the sides char a little.
Once done, squeeze the lemon juice over for a little zing!
I love grilled vegetables! And if you like a bit more seasoning to it, just add a small pinch of salt to them at the end.
Ingredients
Selection of vegetables - I use yellow and red peppers, courgettes and portobello mushrooms
Herbs - Garlic and lots of thyme
1/4 of lemon
Olive oil
Salt and pepper
Preparation time: 15mins
Cooking time: 10mins
Level of difficulty: Easy peasy
Start by making the flavoured oil - Crush 4-5 cloves of garlic and thyme together, mix together with about 75ml of olive oil. Add salt and pepper to season.
While the oil is being infused with all the flavours, prepare the vegetable.
Cut and remove the seeds from the peppers, thinly slice the courgettes and prepare the mushrooms as in Kitchen Tip#5.
Use a brush and generously brush the flavoured oil onto the vegetables.
Heat the grill on high until it is hot.
Place the vegetable on the grill and turn only when you see the sides char a little.
Once done, squeeze the lemon juice over for a little zing!
I love grilled vegetables! And if you like a bit more seasoning to it, just add a small pinch of salt to them at the end.
Friday, October 22, 2010
Le Monsieur's Gazpacho
| Take a chill pill! |
Yesterday, the clouds broke and the rain poured and poured with a vengeance. Acid rain. I could only think about my bougainvilleas because they love acidic soil. My other plants would suffer and I'd have to remember to give the herbs an extra washing if I use them this weekend.
But the haze came right back after the rain, shrouding my usual office view of the tall proud buildings in the downtown area in gloom.
I asked Le Monsieur to make another of his specialities - Gazpacho - a Spanish soup of raw vegetables, served cold. The vitamins contained in the vegetables would help combat the effects of pollution. And I would be grateful for something to cool me off in this swelter!
Le Monsieur's Gazpacho - serves 4
Ingredients
Ingredients
| The usual suspects |
2 red bell peppers - de-seeded and cut into small pieces
5 medium sized tomatoes - skin removed and cut into small pieces
1 cucumber - peeled and cut into small chunks
1 large white onion, diced
2 cloves of garlic, peeled and halved
1 small red chili, cut into small pieces
Juice of 1 fresh lemon
Basil-flavoured olive oil
Basil to garnish
Salt and pepper
Preparation time: 10 mins (with 4 hours chilling time)
Cooking time: None required
Level of difficulty: Easy peasy
Add the ingredients gradually into the blender, adding the lemon juice and olive oil progressively. Continue to blitz until pulpy. Put into the fridge for at least 4 hours to chill thoroughly.
Serve as an appetiser or with toasted garlic bread for a light healthy meal.
Sometimes I put ice cubes directly into mine so that it's really cold and a little more watery. Sometimes, like today, I wish that I could soak myself inside this lovely red bath.
Ahhhhh...
*sizzle*
Tuesday, October 19, 2010
Antipastiiiiiiii Series 2
The weekend was a very hot one! I was thankfully by the pool, as predicted on the Cocktail Page last Thursday. However, my husband was on the "Tour de Bintan" with his buddies. He rides with Team Absolut - a Singaporean cycling team for hunks and such (wink, wink), and a couple of them had signed up for the race in Bintan. What JOY! I admire their determination, they take every single race so seriously... I, on the other hand, enjoy life's simpler pleasures. Sleeping, eating, reading, cooking, sleeping, eating.. you know the one right? Anyway, here is Part 2 of my Antipasti Series.Preparation time: 10 mins
Cooking time: None required
Level of difficulty: easy peasy
Ingredients
Cucumber,sliced thinly
Honeydew melon, spoon scooped
Parma ham, shredded
Toothpicks
Place a scoop of melon on top of the sliced cucumber. Add the shredded parma ham on top. Pierce through all 3 ingredients with a toothpick to hold them tightly.
This is so simple, it is just assembling the ingredients together!
Tuesday, October 12, 2010
Aaaaantipasti Series 1

I had a little event at home over the weekend and since it started at 3pm, I prepared some light bites for everyone to nibble on. Antipasti came into mind…
The flavours of Italy are a favourite in my kitchen and having platters of different antipasti is easy to manage for a small crowd. I will be writing a series of antipasti creations over the next 2 weeks, do have a go at them for they are absolutely divine.
Preparation time: minimal
Cooking time: none required, just whizzing in the food processor/blender
Level of difficulty: easy peasy
Tapenade1 can of pitted black olives, drained
4 anchovies
1 clove garlic peeled
1 tablespoon lemon juice
Splash of olive oil
Good quality bread, lightly toasted (I use ciabatta)
Sour cream (optional)
Add the olives, anchovies and garlic into a food processer/blender and whizz until fine.
Pour in the lemon juice and some olive oil (a small splash) and whizz again, check if consistency is to your liking. If not, add more and repeat.
Spread on toasted bread and as an option, add a small drop of sour cream on top.
Hummus

1 can chickpeas, drained
2 cloves garlic
2 teaspoons cumin powder
2 tablespoon lemon juice
1 teaspoon of salt
4 tablespoon of olive oil
Good quality bread, lightly toasted
Add the chickpeas, garlic and cumin into a food processer and whizz until fine.
Pour the olive oil, salt and lemon juice. Whizz again, check if consistency and taste is to your liking. If not, add more and repeat.
Spread on toasted bread.
Friday, October 8, 2010
Food on Sticks
| Tomatoes, mozza and basil |
Skewers of tomato mozzarella
Cherry tomatoes - 3 per stick (get red and orange ones for colour variety)
Small mozzarella balls - 2 per stick
Basil
Satay sticks, or bamboo skewers
Olive oil
Salt and pepper to taste
Satay sticks, or bamboo skewers
Preparation time: minimal
Cooking time: none required!
Level of difficulty: easy peasy
Skewer the ingredients in alternate sequence: tomato, basil leaf, mozzarella, basil leaf, tomato, basil leaf, mozzarella, basil leaf, tomato.
Drizzle sparingly with olive oil - better if you have basil flavoured olive oil - and sprinkle with salt and pepper for taste. Continue until the ingredients run out! Keep in the refrigerator until ready for serving.
Similarly, you can have meat on a stick too. For that, I suggest a Turkeish style kofte, minced meat, on a stick.
Kofte on Stick - serves 4-6
800g minced beef or 1/2 beef 1/2 pork, or you can use minced lamb
2 red onions, finely diced
5 cloves of garlic, minced
Liberal use of chili powder or use chopped fresh chilis
Liberal use of cinnamon powder
Liberal use of Chinese five spice powder
Chopped flat parsley leaves (substitute with mint leaves if you're using minced lamb)
Chopped corriandar leaves
1 egg, beaten
Salt and pepper to taste
Oil for brushing
Satay sticks, or bamboo skewers
Flour or breadcrumbs (optional)
Preparation time: 5mins
Cooking time: 30mins
Level of difficulty: easy peasy
Preheat the oven to 200 degC and soak the 12 sticks in water.
Put all the listed ingredients in a big bowl and mix well using your hands. If the mixture is too wet, you might want to add some flour or breadcrumbs. Divide the meat into 12 equal portions and shape into long sausage shapes around the sticks.
Put the meat sticks onto an oven tray that has been brushed with oil. Turn the sticks occasionally to ensure even cooking. Grill for 30 minutes or until thoroughly cooked.
Serve with cucumber yoghurt on the side.
Tuesday, September 28, 2010
Four 4 Brunch
I like to entertain at home. Yes, it takes more effort with the cleaning of the apartment and buying some flowers to make it more 'homely'. But, I find it more relaxing, more private and there is no pressure to get the bill.
We had our neighbours (they live in the diagonal apartment to us) over for brunch. In the last year, we have become more than neighbours, we have become friends. So, having them at our apartment has become something rather frequent.
I was trying to create something different besides offering egg benedict or pancakes... So I tried this recipe involving sweet potato cakes, horseradish sauce, sausages, bacon, asparagus and poached eggs.
Sweet Potato Cakes with Horseradish Sauce - serves 4
600g sweet potatoes, shredded 3 eggs
3 heap teaspoon horseradish sauce
2 tablespoons sour cream
Oil for frying
Salt and pepper
Preparation time: 15 mins
Cooking time: 20 mins
Level of difficulty: Easy peasy
Mix the horseradish cream and sour cream in a small bowl until mixed. Set aside.

Add the shredded sweet potatoes in a bowl with eggs, salt and pepper. Mix well.
Pour the oil (I use vegetable) into a frying pan until it has a thickness of about 1cm. Put on medium heat.
When the oil is hot, fry the sweet potato mixture in small batches. About 2 mins on each side or until golden brown. Remove and place on adsorbent paper.
Serve warm with some horseradish sauce.
This is a good alternative to serving bread. It has a nice crispy bite into it and is perfect if you want a fry up breakfast or a laid back brunch. I usually have it with grilled sausages, bacon, asparagus and some nice poached eggs (see kitchen tip#3: Easy Poached Eggs).
Hope you like it and have a good week ahead.
Tuesday, September 14, 2010
Pita on the Go
Some days I am inspired, some days I am creative and just like any other person, some days I am lazy. Today is a lazy day... Hard day at the office, hard journey driving back with maniacs cutting into my lane and hard time thinking of what to cook.
Here is a super duper lazy meal, I enjoy it and I hope you do too. Lazy days are here to stay...
Pita on the Go - serves 2
Ingredients
2 pieces pita bread, bought from any supermarket
2 pieces of sirloin steak
150g cherry tomatoes, halved
Half a Japanese cucumber, chopped into nibble size
Half a small red onion, diced
6-7 leaves of fresh mint, chopped
3 tablespoons of plain yogurt
Pinch of salt and pepper
Dollop of herb butter
Preparation time: 10 mins
Cooking time: 10 mins
Level of difficulty: Easy peasy
Mix the tomatoes, cucumber, onions, mint and yogurt in a bowl. Add salt and pepper to taste.
Heat a griddle or a frying pan (fp) until hot. I use a griddle to create those lovely grill marks!
While the griddle/fp is heating, split the pita bread into half (the pita bread is already pre-cut in packaging) and cut each half into quarters. So you have 8 quarters from each pita bread.
Place the pita quarters on the griddle to toast. Remove when the quarters are slightly brown and crispy. Set aside.
Using the same griddle (it's clean so just re-use it, no washing required)
Add some herb butter to the griddle/fp until melted and cook the sirloin for 2mins on each side.
Now place the pita quarters on a large plate, top with the yogurt dressing and sirloin steak.
Finally, add a little more herb butter for a more creamy, rich finish.
TIP: Herb butter can be created by mixing your favorite chopped fresh herbs into melt butter and refrigerating it.
Friday, September 10, 2010
Power Puff Pastry - Green Curry Seafood Pie and Unexpected Cheese Sticks
![]() |
| Fresh out of the oven - can you smell it like I can? |
What can I make with these unexpected dishes? Crème brulée? Steak and kidney pie? Lasagna? I'd read about the Laksa Fisherman's Pie that was on the menu of a local restaurant but had never tried it. Maybe I could make something similar... like a green curry seafood pie!
Green Curry Seafood Pie - serves 2
200g of white fish, cut into 1 cm chunks (I used red snapper in this case
200g of prawns, shelled
1 medium sized aubergine, cut into small chunks
1 cup of green peas
1 small shallot, diced
1 tablespoon of ready-made green curry paste
150ml of coconut cream
A few leaves of Thai basil
Cooking oil
Puff pastry, ready made
1 egg, beaten
Cooking time: 40 mins
Level of difficulty: Easy peasy
Prepare the puff pastry and preheat the oven to the temperature according to the instructions in the pack.
On low heat, fry the shallot and the curry paste with oil, taking care not to burn the paste. When the onions are soft, add the aubergines. Optional: add 1 or 2 tablespoons of water if it is too dry. Increase to medium heat. When the aubergines are starting to soften, add the peas and the fish. Finally, add the prawns with the basil.
When the ingredients are cooked, lower the heat and slowly stir in the coconut cream. When the coconut cream is mixed with the green curry paste, scope the green curry into the ramekin. Cut a piece of the puff pastry, same size or slightly bigger than the ramekin, and cover the top of the ramekin. Brush with beaten egg and place in the oven for 20 mins or according to the puff pastry instructions.
Looking at the leftover pastry still stretched out on the kitchen table, I thought that it would be a huge waste to throw it out. I raided the fridge for anything inspiring that I could use to make snack sticks with. Some forgotten grated Parmesan - perfect! Sesame cream and sesame seeds would be great too. Or sliced almonds, for that matter.
Green curry pot pie aside, I also made these cheese sticks.
![]() |
| Unexpectably gooooooood... |
Ingredients
Puff pastry - cut up in rectangles approximately 5cm by 10cm
Grated Parmesan cheese - handful
1 egg, beaten
Olive oil
Preparation time: 10 mins (assuming that you are using leftover puff pastry)
Cooking time: 20 mins
Level of difficulty: Easy peasy
Preheat the oven to the temperature as specified by the puff pastry instructions.
Sprinkled the cheese on top of the pastry, and roll them up by the longer end to get a 10 cm long stick. Moisten the outside of the stick with egg. Twist the stick while pulling it to obtain a long twisted stick around 20cm long. Repeat for the rest of the rectangular puff pastries.
Place the twisted sticks on a baking tray that has been greased with oil, leaving some space between each stick. Bake for 20 mins or until golden brown.
These cheese sticks taste amazingly good, even better than those we find in supermarkets! I'm even more satisfied with the cheese sticks than the green curry seafood pie. Like finding a good ramekin dish for $2, it was 100% unexpected!
Tuesday, September 7, 2010
Japanese Sesame Salad

I like a light refreshing salad which is healthy as well as tasty. So when I came across this dressing in a bottle while living in Taiwan, I was determined to re-make it. I was spending way too much on salad dressing at $15 per 100ml... And the result? Voila!! Perfection!
Japanese Sesame Salad - serves 4Sesame Dressing
1 1/2 teaspoon of sugar
2 tablespoons of white japanese vinegar
2 tablespoon of light soy sauce
1 tablespoon of sesame oil
1 medium chili, deseeded and sliced
Splash of lemon juice
Optional-small handful of sesame seeds, lightly toasted
Salad
150g of good quality baby spinach washed
10 cherry tomatoes sliced in half
6 quails eggs hard boiled and de-shelled
8 prawns boiled, de-shelled, deveined and cut into bite size portions
Optional - sliced freshly cut pineapple
Preparation time: 5 mins
Cooking time: 10 mins
Level of difficulty: Easy peasy
Cooking time: 10 mins
Level of difficulty: Easy peasy
Place the sugar, vinegar, lemon juice and soy sauce in a small bowl and mix until sugar is dissolved. Add in the chili and sesame oil, mix and set aside. Prepare the salad ingredients in a large salad bowl. Pour in the dressing and the sesame seeds. Toss until everything is mixed well.
This works very well with any type of mains. I usually bring it to potlucks and it is wiped out in a couple of minutes. Enjoy!